Valve clearance adjustment is a crucial maintenance task for ensuring optimal engine performance and preventing potential damage. In the case of the John Deere PowerTech 9.0 L engine, improper valve clearance can lead to various issues that affect both power output and engine longevity.
When the valve clearance is too little, the valves become out of time. This means that they open too early and close too late, causing them to overheat due to hot combustion gases rushing past them. The excessive heat can cause the valve stems to lengthen, preventing proper seating of the valves. As a result, the valves seat briefly or poorly, hindering proper heat transfer into the cooling system. This can lead to burned valves and a decrease in engine power.
On the other hand, if the valve clearance is set too high, it causes a lag in valve timing, resulting in an engine valve train imbalance. This imbalance affects the intake stroke, causing the fuel-air mixture to enter the cylinders late. Additionally, the exhaust valve closes early, preventing complete removal of waste gases from the cylinders. Moreover, the valves close with a significant impact, increasing the risk of valve cracking or breaking, and potentially damaging the camshaft and followers.

Related Contents:
John Deere Service Advisor 5.3.235 AG+CF 2023 2020 2018 Free Download
JOHN DEERE EDL V2 Diagnostic Adapter
To address these issues, proper valve clearance adjustment is necessary for the John Deere PowerTech 9.0 L engine. Here is a step-by-step guide on how to clear and adjust the cylinder valves:
1. Before starting the adjustment process, always disconnect the negative (-) battery terminal to prevent accidental engine starting.
2. It is crucial to check and adjust the valve clearance when the engine is cold.
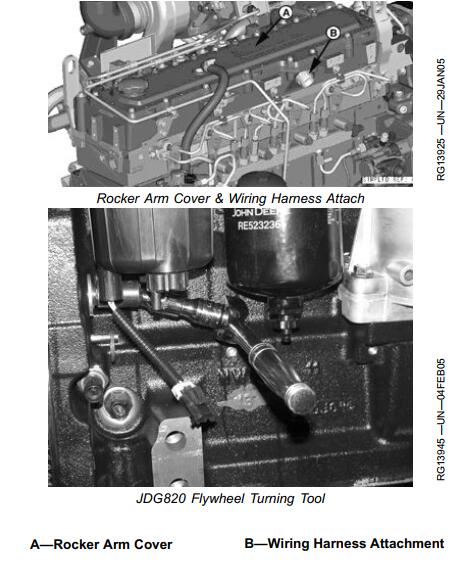
3. Disconnect the main wiring harness from the right side of the intake manifold.
4. Remove the rocker arm cover along with the vent tube.
5. Inspect the contact surfaces of the valve tips and rocker arm wear pads for excessive wear, breakage, or cracks. Replace any damaged parts.
6. Use a flexible socket extension to rotate the engine and avoid interference with the fuel filter assembly.
7. Remove the plastic plug from the cylinder block bores and install the JDG820 Flywheel Turning Tool and Timing Pin.
8. Rotate the engine with the flywheel turning tool until the timing pin engages the timing hole in the flywheel.
9. Check the valve clearance for the appropriate cylinder by ensuring that the rocker arms for that cylinder are loose. For example, if the rocker arms for the No. 1 (front) cylinder are loose, the engine is at No. 1 TDC-Compression. If the rocker arms for the No. 6 (rear) cylinder are loose, the engine is at No. 6 TDC-Compression. Rotate the engine one full revolution (360 degrees) to No. 1 TDC-Compression.
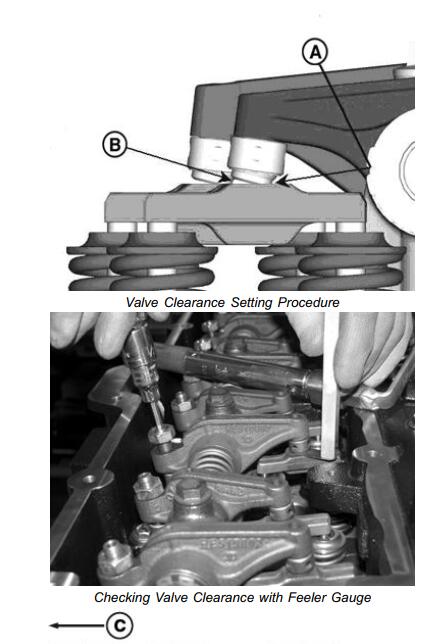
10. To facilitate valve clearance adjustment, push the rocker arm foot forward for easier access with a feeler gauge.
11. If the engine has undergone an overhaul where the roller camshaft followers have been removed or replaced, it is crucial to apply firm downward pressure over the rocker arm adjusting screw, using a push rod to seat the roller follower on the camshaft. Failure to complete this step can result in loose valve clearance settings.
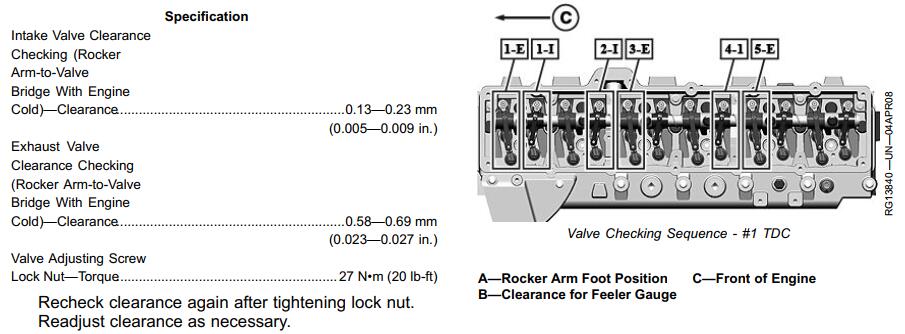
12. With the engine lock-pinned at the TDC (Top Dead Center) of the No. 1 piston’s compression stroke, use a bent feeler gauge to check the valve clearance on the appropriate exhaust and intake valves (e.g., Nos. 1, 3, and 5 exhaust valves and Nos. 1, 2, and 4 intake valves). If the clearance is out of specification, loosen the lock nut on the rocker arm adjusting screw. Turn the adjusting screw until there is a slight drag on the feeler gauge. Hold the adjusting screw in place with a screwdriver and tighten the lock nut to the specified torque.
By following these steps, you can ensure proper valve clearance adjustment for the John Deere PowerTech 9.0 L engine. Regularly checking and adjusting the valve clearance will help maintain engine performance, prevent damage, and prolong the engine’s lifespan.


