Here is the step-by-step guide on how to clean EGR valve for Scania Truck 7 litre engine.
Related Contents:
2021 Scania SDP3 Diagnostic Software Free Download
How to Use Scania SDP3 Reset Service Indicator for Scania Truck
Procedures:
1.Remove the EGR valve from the engine.
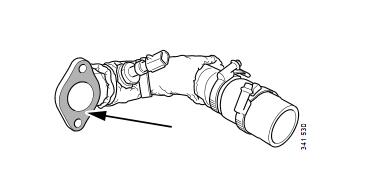
2.Check the part of the pipe that connects to the EGR valve. Clean the sealing surface if necessary.
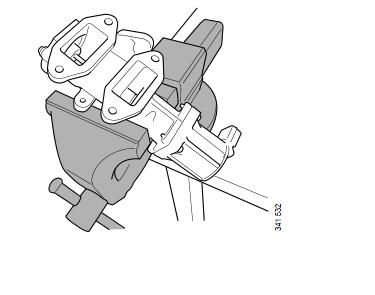
3.Fit the EGR valve in a vice.
Cleaning and inspection for reusing the EGR valve
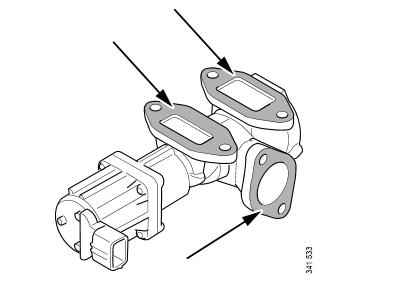
1.Remove the gaskets and clean the sealing surfaces to the connecting pipe.
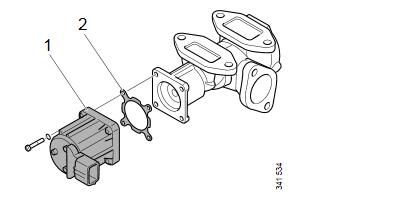
2.Mark the position of the EGR valve electric motor (1) in order to be able to refit the electric motor in the same way.
Then remove the electric motor with shim (2).
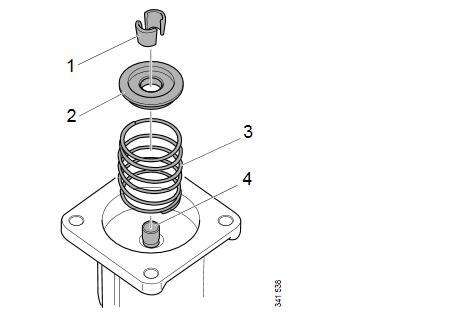
3.Remove the split collets, valve spring collar and valve spring by doing the following:
Press down the valve spring collar (2) by hand or using a socket. The split collets should then (1) release from the valve stem (4).
Tap carefully with a hammer if the split collets do not come loose.
Once the split collets have released: remove the split collets (1), valve spring collar (2) and valve spring (3).
4.Dry cleaning:
* A thin layer of carbon deposits on the inside of the EGR valve is normal and does not need to be removed.
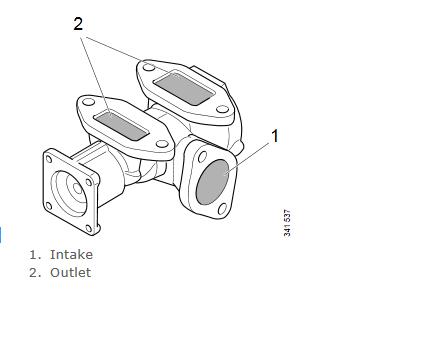
* Remove the accumulated soot in the EGR valve inlet (1) and outlet (2) with a small nylon or wire brush. Some of the deposits may need to be scraped off.
* Stop scraping when the black soot has gone, so you do not damage the corrosion protection.
* Press in the valve stem for general access, but take care not to damage the valve seal.
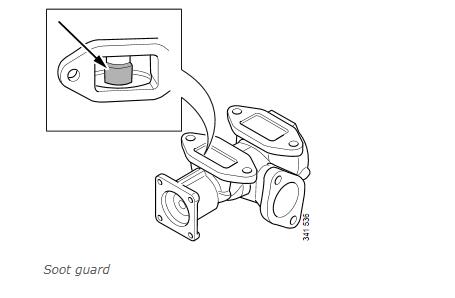
* Clean around the soot guard with a 90° scraper.
Wet cleaning:
* Only use carburettor cleaner, this is the most effective detergent to use for cleaning.
* Ensure that the EGR valve is lying horizontally in the vice, with the outlet (2) upwards.
* Plug the inlet (1) and fill the EGR valve with carburettor cleaner through the outlet (2). Ensure that the detergent covers the valve stem.
* Move the valve stem forwards and backwards and twist it when the valve disc is up against the valve seat (closed position). Allow to work for five minutes and then drain the carburettor cleaner.
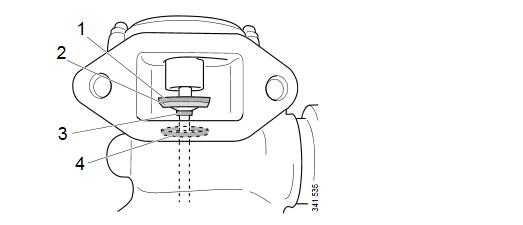
* There are 2 valve discs located on the valve stem. The illustration shows one valve disc (1).
* Use a small nylon or brass brush to clean around the valve seal (2), valve stem (3) and valve seats (4).
* Take care not to damage the sealing surfaces. Use additional detergent if necessary.
* The soot guard consists of an inner and outer cylinder which must be closed with a gap at the bottom.
* Use a small nylon or brass brush to clean around the soot guard. Use additional detergent if necessary.
* Empty the remaining detergent and use compressed air to blow the EGR valve clean.
* Repeat the wet cleaning if necessary.
A clean EGR valve gives a metallic sound when it closes. If any deposits remain that keep the valve open, the valve closes with a duller sound.
5.Reset the EGR valve:
* Fit the valve spring (3) and valve spring collar (2).
* Place the split collets (1) on the valve spring collar.
* Hold the valve stem (4) from the opposite side with one hand. Press down the valve spring collar with the other hand, or using a socket until the split collets are below their locking position on the valve stem.
* Position the split collets carefully against the valve stem and release the pressure on the valve spring collar.
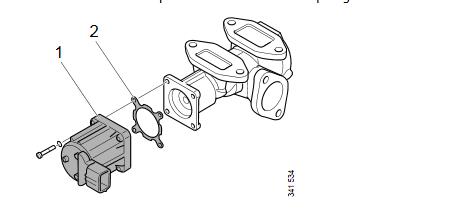
* Refit the EGR valve electric motor (1) and shim (2) to the EGR valve.
Standard finishing operations
1.Check the harness-to-harness connector (1) to the EGR valve electric motor. There must not be any rust or wear.
2.Fit the harness-to-harness connector to the EGR valve, connect the battery and switch on 15 voltage without starting the engine.
It is normal for soot and condensate to run out of the overflow opening (2).
3.Connect the diagnostic tool and check whether fault code 1896 remains. If fault code 1896 remains, the EGR valve must be renewed.
4.Fit the EGR valve on the engine.